
In this post, I show you a simple way to make a Jekyll website locally (without the internet) using available themes.
TL;DR
-
Creating a blank site,
See all steps- Install Ruby and its dependencies. Check step 1 in this section.
-
Install Jekyll Bundler.
$ gem install jekyll bundler - Choose a place to store all local websites, namely LocalSites.
-
Create and run the new Jekyll site
$ cd LocalSites
$ jekyll new <name-of-site>
$ cd <name-of-site>
$ bundle jekyll exec serve –port 1234Browse http://localhost:1234 to see your result.
- If there are some errors, check step 5 in this section.
-
Using available themes,
See all steps- Install Ruby and its dependencies. Check step 1 in this section.
-
Install Jekyll Bundler.
$ gem install jekyll bundler - Choose a place to store all local websites, namely LocalSites.
- Choose and download a theme, e.g. Jasper2.
-
Install particular gems of the theme,
$ cd LocalSites
$ cd jasper2
$ bundle install - Modify theme’s settings: make sure that fields
urlandbaseurlare blank. -
Create and run the new Jekyll site
$ bundle jekyll exec serve –port 1234
Browse http://localhost:1234 to see your result.
- If there are some errors, check step 5 in this section.
Why we need a local website?
You have an online Jekyll website, you have many “draft” posts, you have many customs on the theme you are building but you don’t want to test them on the final version where everyone can see it. It’s easier if you can test all things on your local machine before publishing them.
Quickly create a website with Github Pages and available themes
A local Jekyll website has all features of a normal Jekyll website. It has even more advantages than Github Pages because you can use third party plugins on a local website whereas Github Pages doesn’t support fully.
Create a new blank website
In this section, you will create a local website with default jekyll theme. Actually, it’s great only if you start to build by yourself a new Jekyll theme. Otherwise, you can check next section for using an available theme.
$ gem -v
$ gcc -v
$ g++ -v
$ make -v
- On Windows, download and install RubyInstaller (with DevKit). For more complicated cases, read this.
-
On Ubuntu/Debian Linux,
$ sudo apt-get install ruby ruby-dev build-essentialIf you don’t want to install Ruby Gems as a root user, we need to set up a gem installation directory for your user account. From this step, whenever you wanna install a new gem, just use
gem installinstead ofsudo gem install.$ echo '# Install Ruby Gems to ~/gems' >> ~/.bashrc
$ echo 'export GEM_HOME=$HOME/gems' >> ~/.bashrc
$ echo 'export PATH=$HOME/gems/bin:$PATH' >> ~/.bashrc
$ source ~/.bashrc -
On Fedora Linux,
$ sudo dnf install ruby ruby-devel @development-tools -
On MacOS, first you need to install the command-line tools,
$ xcode-select --installand then you need to install Homebrew and use it to install Ruby,
$ /usr/bin/ruby -e "$(curl -fsSL https://raw.githubusercontent.com/Homebrew/install/master/install)"
$ brew install ruby
Not that, sometimes you need to use sudo (on Linux) or open the terminal under admin users (Windows) to use above line of code.
/LocalSites.
$ cd LocalSites
$ jekyll new <name-of-site>
After this command, a new folder named <name-of-site> will be created in the folder where terminal is working on. You can now start the local server to host this site by
$ cd <name-of-site>
$ bundle jekyll exec serve –port 1234
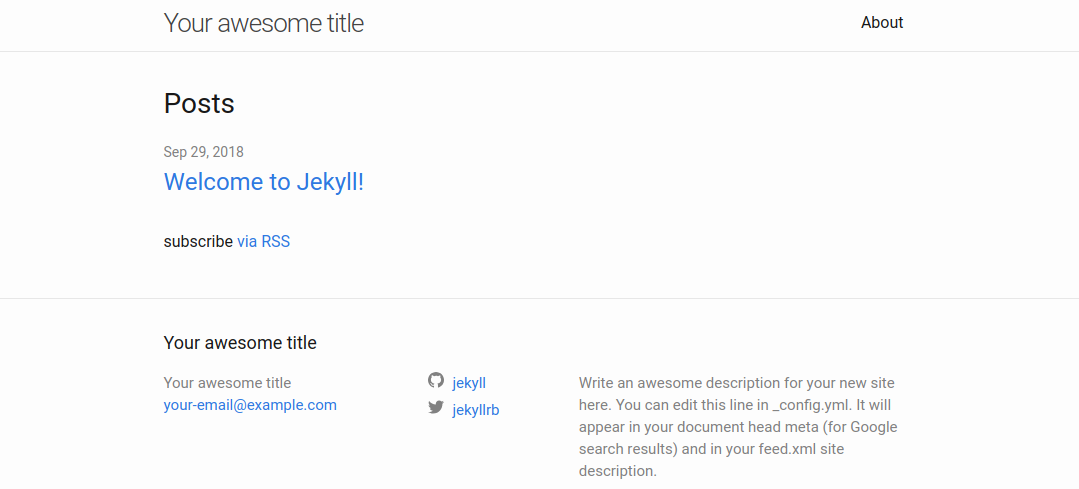
If you don’t use --port 1234, the default port is 4000, you can now browse your new website at http://localhost:1234. It will look like,
- If you meet error “commonmaker: failed to build gem native extension”,
- Check if you have already installed Msys2, or you can download and install it for sure.
- After that, you need to reinstall Ruby, download at here. Everything should be set as default.
-
Moreover, Ruby-dev is also needed to be installed. On Windows, you need to extract the downloaded .zip file into system drive, i.e., C:\RubyDevKit and then
$ cd C:\RubyDevKit
$ ruby dk.rb init
$ ruby dk.rb install
-
If the error relates to
ffi(on Linux),$ sudo apt-get install libffi-dev -
If you meet something with
nokogiri,$ sudo apt-get install build-essential patch ruby-dev zlib1g-dev liblzma-dev
$ gem install nokogiri - In the later steps, if you meet “Could not find … in any of the sources”, there are two ways to handle it,
-
If the error tells you that you miss some packages, e.g. Could not find abc-xyz-1.0.0, install it,
$ gem install abc-xyz -
Open
Gemfile.lockand modify the lines afterPLATFORMSintoPLATFORMS java
-
Create locally website with an available Jekyll theme
If you want an “instant” websitre with some given themes, you can follow below steps.
LocalSites. Suppose that I choose Jasper2 as a theme I want, so we have all files being in /LocalSites/jasper2/.
| jasper2
|--- # some folders & files
|--- _layouts
|--- _posts
|--- _config.yml
|--- index.html
|--- # some folders & files
Gemfile.lock is also created in the same folder.
$ cd jasper2
$ bundle install
baseurl: leave it blank.url: leave it blank.
There are many other options that you can customize as you wish. They depend on the theme you choose and what you want to add to your website. It’s not the purpose of this post, I just want to make sure that you can properly run the site.
$ bundle jekyll exec serve –port 1234
If you don’t use --port 1234, the default port is 4000, you can now browse your new website at http://localhost:1234. It will look like,